Thursday, June 12, 2014

Three Cards: NBUS


http://www.djkardkreations.com/2014/06/nbus-challenge-1-celebration.html


I have three cards to post today, and they are all made with NBUS--lots and lots of NBUS.  If you don't know what I am talking about....run, don't walk...over to Darnell's playhouse, where she will tell you all about how we should be using some of the craft supplies we buy.  What a concept?    Darnell is even running a very fun challenge designed to get you to use your NBUS.  Now, I already exceeded the maximum number of entries (sorry, Darnell), but I didn't realize it.  So, these cards are just for fun, and I am including this link so you can join in on the fun, too.


Simon Says Wednesday Challenge is to use a stencil, and I have two cards using the SSS Extra Large Dots stencil that I just got.  I was inspired to get the stencil and make this card by this card of Laurie's.

Other NBUS on this card are the sentiment stamp from Verve and the Heidi Swapp spray mist.  Everything else has been used at least once.


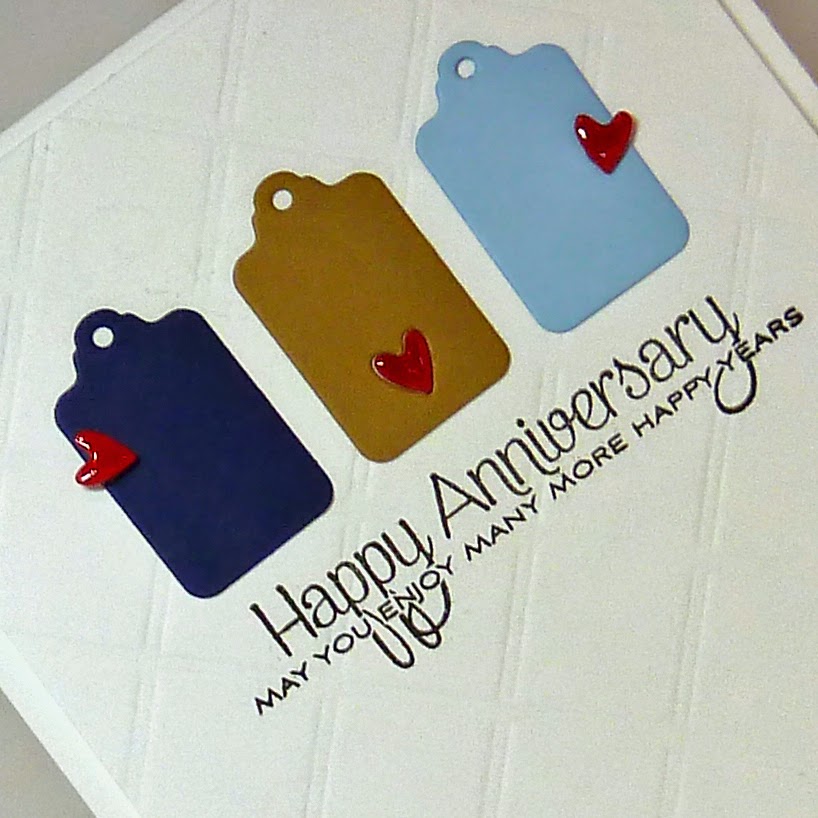
I used the same stencil on this card, but sponged and blended various Distress Inks over the stencil.  My sentiment is NBUS from Avery Elle Brushed--stamped in Memento Luxe Nautical Blue and clear embossed, and the stars are from Mama Elephant Make a Wish.


My last card uses NBUS from Avery Elle Balloons and colors from ColourQ #245.  I am also entering it at Seize the Birthday without toppings this week.


AND...in a first for me...I am playing along at Addicted to Stamps in their #99 Clean and Simple challenge.  I am entering all three cards into that challenge.  How have I missed this one?

That's it for me today.


Thanks for Visiting

Tuesday, June 10, 2014

CASology Week 99: Anniversary


It's time for another challenge at CASology.  This week our cue word is ANNIVERSARY.  Doesn't it seem like a lot of anniversaries are in June?  What better way to add an anniversary card to  your stash than to play along with us this week and create a CAS Anniversary card.

I decided to make the kind of anniversary card I could see giving to my DH next year.  So, nothing floral, fru fru or too lovey dovey.  Clean and Simple is just the right style for my guy.  I was inspired by the sketch at Retro Sketches this week, and so followed that sketch for my card.  In fact, I think one of the easiest ways to make a CAS card is to follow a CAS sketch.  With a sketch, most of the design decisions are already made.  All you have to do is follow the sketch and avoid the temptation to add too much extra.


I cut three tiny tags out of SU Night of Navy, Baked Brown Sugar and PTI Spring Rain and adhered them to my card front, which was already stamped with a sentiment from PTI Beautiful Butterflies and impressed with the Guide Lines IP.  I put a little Red heart on each of the tags and then coated it with Glossy Accents.  That was it.  Done.


Now, it is your turn.  What do you think of when you see the word ANNIVERSARY?  Have some fun with the cue word ANNIVERSARY, and then please link up your creation on the CASology blog by Monday 6/16 at noon (CST). 

Check out the beautiful designs from the CASology Design Team members and see how they were inspired by ANNIVERSARY.  
 
Don't forget to keep your card Clean and Simple.


Sunday, June 8, 2014

My Crafty Weekend


My last two mini notebooks for this week's Make it Monday #167...This was a really fun project, and I think I learned some tricks along the way.


The next four cards are all for different challenges, but they all have one thing in common--NBUS!!!  If you have not been living under a rock, you are probably familiar with Darnell, her fabulous creations, her friendly blog, and her obsession with NUBS (never-before-used-schtuff).  Darnell is celebrating 500 followers with a challenge to encourage us all to get out our new schtuff and USE IT.  So, I used something new in each of my four cards.


First up is this birthday card that uses a brand new stencil and several new colors of Distress Ink.  I am entering it at Simon Says Monday Magic challenge, because I do think that the way the Distress Inks blend and fade off is pretty magical, and I was able to surround my sentiment without actually masking it off--just had the blending kind of fade off near the sentiment.


Edited to add that I am also linking up to Paper Crafting Challenges for stencils.  

This next card uses some brand new-to-me Verve stamps that I was lucky enough to pick up on sale a while back, and foolish enough to keep sitting on my desk for months.  I am entering this card at Time Out #7:  Summer with Optional Twist of Flowers.  I'm not quite sure, but this might be my first time playing at Time Out.


It has been a long time since I have played in the Fusion Challenge and I don't think I have ever been able to pull off one card with the photo and the sketch--but that is what I did here today.   My NBUS on this card are the Verve Poppy Birthday stamps.  I was inspired by the colors and the flowers and that little bit of newsprint I could see under the flowers.  I am also entering this at Time Out #7.


My last card today uses this sketch from CAS(E) this Sketch #79.  My NBUS for this card is this 'hello' stamp from Hero Arts Live Life.  All the inks are Memento Luxe pigment inks. 


That's it for me today.  One more week of school for my daughters and then we can finally start summer.  Yay!!


Thanks for Visiting

Friday, June 6, 2014

3 Simple Cards


I made a card using this week's CAS(E) This Sketch #79, and am also entering Iron Craft for the first time.  I used Avery Elle Bonjour stamps and various Memento Luxe inks.  I have to say (again) how much I love these inks--the coverage for solid stamps is so great.  They stamped perfectly every time.


I hope you are not sick of the ColourQ #244 colors, because I have two more cards using them.  When I made this card set that I posted yesterday, I stamped a 4 1/4 by 7 panel using the middle sized flower from WMS Funky Flowers.  After cutting that panel into 1 1/2 strips, I decided that the scale was off, so put those strips aside and stamped another panel using the smallest flower.  I took my original stamped strips and turned them into two simple thank you cards, inspired by this card Laurie posted the other day.  I loved the idea of the sentiment on a stitched rectangle panel sitting atop a scribbled circle die cut.  I am entering these cards at Virginia's View Challenge #4 Tags & Scraplings.


That's it for me today.  


Thanks for Visiting

Thursday, June 5, 2014

A Card Set and Another Mini Notebook


I promised to show you what was in this gift bag I posted yesterday, so I am back with some photos for you.  I followed a tutorial I saw on the Reverse Confetti blog to make this card set.  I used the same color scheme as the card from ColourQ #244 and added texture to my stamped panels, so am entering this card set at Addicted to CAS #39.

I used Reverse Confetti Lots to Say for the sentiment, Waltzingmouse Simple Sprig for the flowers, and Lawn Fawn Penelope's Garden for the leaves.


Attempt #2 for this week's Make it Monday #167 to make a mini notebook was a little more successful.  I put a couple of layers of rubber cement on the edge of the paper stack, before using Scor Tape to put it all together.  I think that little bit of magic helped a lot.  I am also entering this into Simon Says Monday Magic challenge. 


My colors are from this week's ColourMe #23 Monochromatic Coastal Cabana, my sentiment is Think Big, and the images are from Oopsy Daisy.  I used white, Aqua Mist, Hawaiian Shores and Tropical Teal papers and inks.


That's it for me today.  I hope you are not sick of this week's ColourQ colors, because I have some more cards for tomorrow using a stamped panel I made for this card set, but then rejected.


Thanks for Visiting

Wednesday, June 4, 2014

A Mini Notebook and Two Cards


Hello friends.  I've got a couple of things to post today.  First up is a little mini notebook I made for this week's Make it Monday #167:  DIY Notebooks.  I am also entering my little notebook at Simon Says Monday Magic challenge, as I think a bit of magic is required to get these notebooks to stay together. 


Here is my mini notebook.  It is 2 3/4 by 4 1/2--that means that it is 1/8 of a sheet of paper.  I used a partial sentiment from Desktop Design and wrote the word 'NOTE' using Headline Alpha stamps.   I used Circle Scribbles to decorate the front.


The pages inside are all stamped in Versamark with assorted little images from the Tag-it's series, and I alternated the colored pages.  The magic here---the notepad is held together with Scor Tape.  And, it is magic because it didn't work on every page, and I have no idea why some pages are staying in and some are falling out.  I am going to keep this one for myself, and try again.  Perhaps if I say Abra Cadabra or something, my next one will stay together better.  Anyhow, I think I am going to coat the front and back with Modge Podge to make it sturdier.


Next up is a thank you card for my daughter's art teacher.  I think I found the perfect stamp set for an art teacher--Paper Smooches I Heart Art.  I'm entering this card at Paper Smooches Sparks Anything Goes, ColourQ #244, and Addicted to CAS #39: Texture.


I stamped my focal point on a piece of white that was cut with the Tipped Tops Die.  My second layer was also cut with Tipped Tops and then impressed with the Picnic Plaid IP.  I stamped a random pattern of paint splotches on my card base, then fussy cut a paintbrush.  I used Fantastix to color in the tip of the paintbrush with the same Tangerine Tango ink that I used on the card and then coated it with Glossy Accents.  My card is hanging off the front of a gift bag, using Laurie's Card Hanger Die.  Next post, I will show you what I made to go inside the bag.


Last up is my card for this month's One Layer Simplicity Challenge:  I've Been Framed.  I used a variety of Tiny Tags frames stamped along the bottom edge of my card.  Before stamping, I scored a diagonal line that was to divide my card between stamped area and white space.  I filled in a random number of my frames with tiny birthday-related sentiments from Tiny Tags and Mixed Messages, and then stamped 'Happy Birthday' above the score line.


That's it for me today.  Have a great Wednesday.


Thanks for Visiting
Related Posts Plugin for WordPress, Blogger...