Showing posts with label Background Basics Circles. Show all posts

Thursday, February 6, 2014

PTI 7th Anniversary and Make it Monday


Hello everyone.  I am getting caught up in the PTI 7th Anniversary festivities, and I have 3 cards to share today.   My first card uses Delightful Dahlia Additions, and the color scheme and sketch shown above.


My next two cards are also for this week's Make it Monday #151:  Drop Shadow Die Cuts, and they both use this sketch.


I hope I have time to play a few more times over the next couple of days.  I am having trouble getting the color combinations to work with the sketches.  Am I the only one?

That's it for me today.

Thanks for Visiting

Tuesday, January 29, 2013

Clean & Simple Card Making (2) Day 2--Part 2, and ColourQ #174


I wanted to try one more technique that we learned this morning, and this week's ColourQ #174 colors were just what I needed for my card.  The technique is masking and reverse masking, as well as a simple faux embellishment.  I used a tiny dark pink rhinestone for the Raspberry Ripple, PTI Hibiscus Burst ink for the Primrose Petals, Memento Angel Pink Ink for the Pink Pirouette, Memento Rich Cocoa Ink for the Early Espresso, and Vintage Cream card stock for the Vanilla.

I die cut a heart out of a 4.25 x 5.5 " paper, right where I wanted my heart positioned on my card, used temporary adhesive to stick it to my card front, and sponged Memento Angel Pink within the heart shaped space.  Then, I removed that mask, covered the pink heart with the mask, and stamped Background Basics Circles across the card front.  Removed the heart mask, and I had my focal point. 


My faux embellisment is made just like Julie's, from a domed epoxy circle I found in my stash, adhered over a bit of stamped card stock.


Supplies Used (PTI):
Stamps:  Background Basics: Circles, Think Big Favorites, Lawn Fawn Belinda's Borders
Paper:  Vintage Cream
Ink:  Memento Rich Cocoa & Angel Pink, Hibiscus Burst
Other:  Domed Epoxy Circle, Rhinestone


Thanks for Visiting

Wednesday, December 19, 2012

CASology #24 and RetroSketches #42


Popping in quickly to share two cards.  The first one is for this week's CASology #24, where the key word is 'Star'.  I immediately thought to pull out Star Prints, which is kind of new to me.  I also added a few stars from the Tag it's set.  I die cut part of the star from the front panel, and replaced it with the red star in the negative space.  The front panel is raised, but the red star is not.


CASology #24


Next up is a card for RetroSketches #42.  Here is the sketch.


I found this sketch to be trickier than I originally thought.  I tried a number of things before settling on this card.  Still not quite sure if I like the card, but I know I love that cute mitten paper.

Retro Sketches


Supplies Used (PTI):
Happy Birthday:
Stamps:  Star Prints, Tag-it's, Background Basics Circles, Paper Smooches Sentiment Sampler
Paper:  White, Kraft, Pure Poppy
Ink:  Kraft, SU Real Red
Other:  Star Dies

Celebrate the Season
Stamps:  Think Big
Paper:  Plum Pudding, Soft Stone, EP Winter Wishes
Ink:  Plum Pudding
Other:  Ribbon, MFT die


Thanks for Visiting

Sunday, June 10, 2012

Happy Father's Day


Are you ready for Father's Day?  I am, as of now.  I've got three cards to share today, and one of them uses one of this week's Make it Monday MIM#69 sketches.


I had to take some liberties with the flowers--I used a stamp from Grunge Me instead, and made it into a background, since everything else I tried looked strange.

MIM


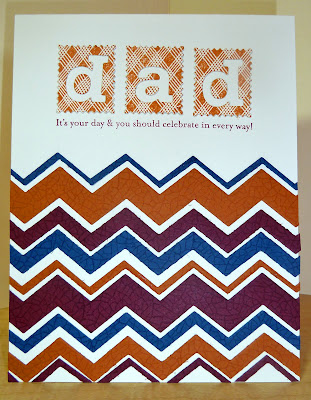
I finally broke out my new Chevron Dies for this next card.  I took pieces of Canyon Clay, Enchanted Evening, and Scarlet Jewel card stock and stamped them with the Crackle Background stamp.  Then, I cut then into random width chevrons, and arranged them on my card.  I got the idea to cut letters out of postage stamp die cuts from this card by Kara.

Chevron

Despite my excitement several months back over the Movers and Shakers dies, this is the first time I have used this die set to make a slider card.  It came together pretty easily, thanks to the tutorial here.

Slider


Here is a peek at the inside:


Supplies Used (PTI):
MIM
Stamps:  Alpha Blocks, Grunge Me, Movers and Shakers Sentiments
Paper:  Canyon Clay, White, Kraft, Fine Linen Pattern Pack
Other:  Alpha Blocks Die

Chevron
Stamps:  Half & Half, Movers and Shakers Sentiments, Crackle Background
Paper:  Vintage Cream, Enchanted Evening, Canyon Clay, Scarlet Jewel
Other:  Postage Die, Alphabet Die, Chevron dies

Slider
Stamps:  Movers and Shakers Sentiments, Background Basics Circles, Turning a New Leaf, Clear Dollar Father's Day sentiment
Paper:  Enchanted Evening, Soft Stone, Scarlet Jewel
Other:  Sliders Dies, Limitless Layers Ovals


Thanks for Visiting

Tuesday, February 28, 2012

Make it Monday 55: Feel Better


This week, Dawn McVey shows us how to create large frames with smaller frame stamps in MIM#55.  This is an easy and handy technique, and I can see using this often.  I used this week's ColourQ cQc#126 colors for my card.  How cute are those dishes with the owl--I think I need those, too.


Supplies Used (PTI):
Stamps:  Fillable Frames, Background Basics: Circles, Background Basics: Text Styles, Mixed Messages
Paper:  Rustic White, Orange Zest, Summer Sunrise
Other:  Beautiful Butterflies Dies


Thanks for Visiting

Wednesday, February 22, 2012

Big News and One Layer Wednesday


I have some exciting news to announce:  I am a Paper Doll!!!  I have been asked to join a really fabulous group of women paper crafters, and I am just so thrilled and honored to be a part of their group.  We will be hosting challenges starting in March, and I don't know what else, but I am ready and willing.  You can see the other members of this group on my new sidebar to the left.  Click here to go to our Paper Dolls website.

I have a card for this week's One Layer Wednesday OLW80 which is to use two colors, two images, and masking. Sentiments are optional but must be in one of the two colors, just to make the whole thing more diabolical, um, challenging. (Susan's words, not mine).  I found the challenge fun and interesting.  I may try to do some more if I have time.


Supplies Used (PTI):
Stamps:  Background Basics Circles, Hero Arts Thank You Messages
Paper:  White


Thanks for Visiting

Friday, February 17, 2012

College Bound


This is my second post of the day.  For my Waltzingmouse Blog Party card, please click here.

This week's Make Monday #53 is all about Creative Coasters.  I used a coaster to cut out the adorable car from Enjoy the Ride.  Then, I cut some Aqua Mist paper, adhered the two together and then completely saturated it in Perfect Pearls mist.  In real life, this car is VERY shiny. This card is going to my niece, who is eagerly awaiting the remainder of her college acceptances.  She's gotten enough so she knows she will be going somewhere, not enough to make a final decision.


Supplies Used (PTI);
Stamps:  Enjoy the Ride, Background Basics Circles, Polka Dot Basics, Think Big Favorites
Paper:  Aqua Mist, Hawaiian Shores, Pure Poppy
Other:  Dies:  Enjoy the Ride, Mat Stack 4 Layerz, Pinking Edger


Thanks for visiting

Wednesday, February 8, 2012

Hugs and Kisses and Circles


My Background Basics Circles set arrived in the mail today--it is the set I chose when I was the randomly chosen winner in the December PTI Blog hop--and I immediately broke it open and started to play.  Now, I know I should have chosen one of the many beautiful color schemes given to us this morning as part of Papertrey's 5th Anniversary celebration and made another card to enter that challenge.   

But a card popped into my head for this week's One Layer Wednesday, OLW#78, Circles, Circles Everywhere, and so I had to go with that.  I used Aqua as my main (and only color) for this week's Less is More Week #53 challenge "Aqua".

After many botched attempts, generating lots of scrap paper, I was finally able to get my stamping and die cutting all to work together for this card.  It's really true that these one layer cards leave no room for error and no place to hide mistakes.  Good thing I was able to remind myself that "it's only paper".


Here is what it looks like opened up:

Supplies Used (PTI):
Stamps:  Background Basics:  Circles, Heart Prints
Paper:  White
Other:  Heart die


Thanks for Visiting
Related Posts Plugin for WordPress, Blogger...