I'm back with more entries into this month's Papertrey Blog Hop. I decided to make a coordinating pillow box gift card holder to match with the card I made for the blog hop here. Wow--that Summer Sunrise balloon did not photograph well--trust me when I say it looks much brighter in person.
Here is the card and pillowbox together.
We got a bonus day video from the Pattern Play class yesterday. I used sequins on the card I made for that day, so will also be entering it into the PTI blog hop challenge. I stuck close to the design shown in the video, and broke into my newest pattern paper pad--Color Crush by American Crafts. I am also entering this card into the Chevron Challenge in the Moxie Fab world.
Thanks for Visiting
I have a card for this week's Make it Monday #108: Inked Backgrounds. I used a mixture of PTI blue and green inks and the World Map and Destinations stamps. The card seemed kind of manly, so I used a Fillable Frame sentiment to make it a Father's Day card, and I just hope I can find it in a couple of months.
The next 3 cards use a variety of the techniques and principles taught in the Pattern Play class. Betsy Veldman did a video on Day 5 which inspired me to pull out my stash of 12X12 papers to see if there were any there I could cut up for a card.
This first card uses some paper I think I bought a Target a while ago. It was a package of several color coordinated sheets that I bought because I loved the colors and designs, but then could never figure out how to use them on a card. I took one pattern, cut it into uneven strips and then flipped every other strip upside down. I fussy cut some leaves out of a coordinating piece from that same pack. The paper is very flimsy, so I adhered the cut leaves to some Vintage Cream paper and cut again, this time leaving a border. I used the same Father's Day sentiment from the first card (benefit of not cleaning up).

The next two cards use the same piece of patterned paper--it's got a super busy and bright pattern that had intimidated me--until now. I used the Everyday Photo Finishers and experimented with two different layouts. I did not cut this paper into strips, since there were sort of strips already in the pattern. The back of this paper says Anna Griffen, and it is probably from either Michaels or Joann's.
Here they are together. I think I prefer the card on the left. Like that bow? Doesn't it actually look like a bow? I used my Bow Easy again, and I don't think I'll ever tie another bow without it.
That's it for me today. I'll be back tomorrow with a card for the PTI blog hop. Do you have your sequins ready?
Thanks for Visiting
I have 4 cards as homework for Pattern Play days 4 and 5, and this time, I incorporated several of my favorite challenges as well.
Day 4 was all about altering patterned paper. There are all sorts of things one can do to change up the look of patterned paper. My first card uses a very sweet stamp that I won from Serendipity called Three Dresses, and papers from Carta Bella Beautiful Moments. I used three different patterns from this pad to paper piece each of the dresses, and a 4th pattern for my card front. I used faux stitching (the only kind I know how to do) on my card front with the Lil Inkers Stitched Rectangles dies.
My next card uses papers from Lawn Fawn Bright Side, which I have altered by using Ranger Enamel Accents in black and white for all the flower centers, and Frosted Lace Stickles on all the flower stems. I am also entering this card in this week's Seize the Birthday sketch challenge and Simon Says Stamp challenge to make a spring card.
Moving on to Day 5--Paper Manipulation. My first card uses a paper quilting technique taught by Kristina. I think this is such a fun look, and will definitely be doing this again. My card uses papers from American Crafts Hip Hip Hooray, and follows the sketch from this week's Seize the Birthday challenge. There is no stamping at all on this card, as I used my new PTI Headline Alphabet and Numbers dies for the sentiment, so I am entering this card into this week's CAS-ual Friday's challenge of 'No Stamps'.


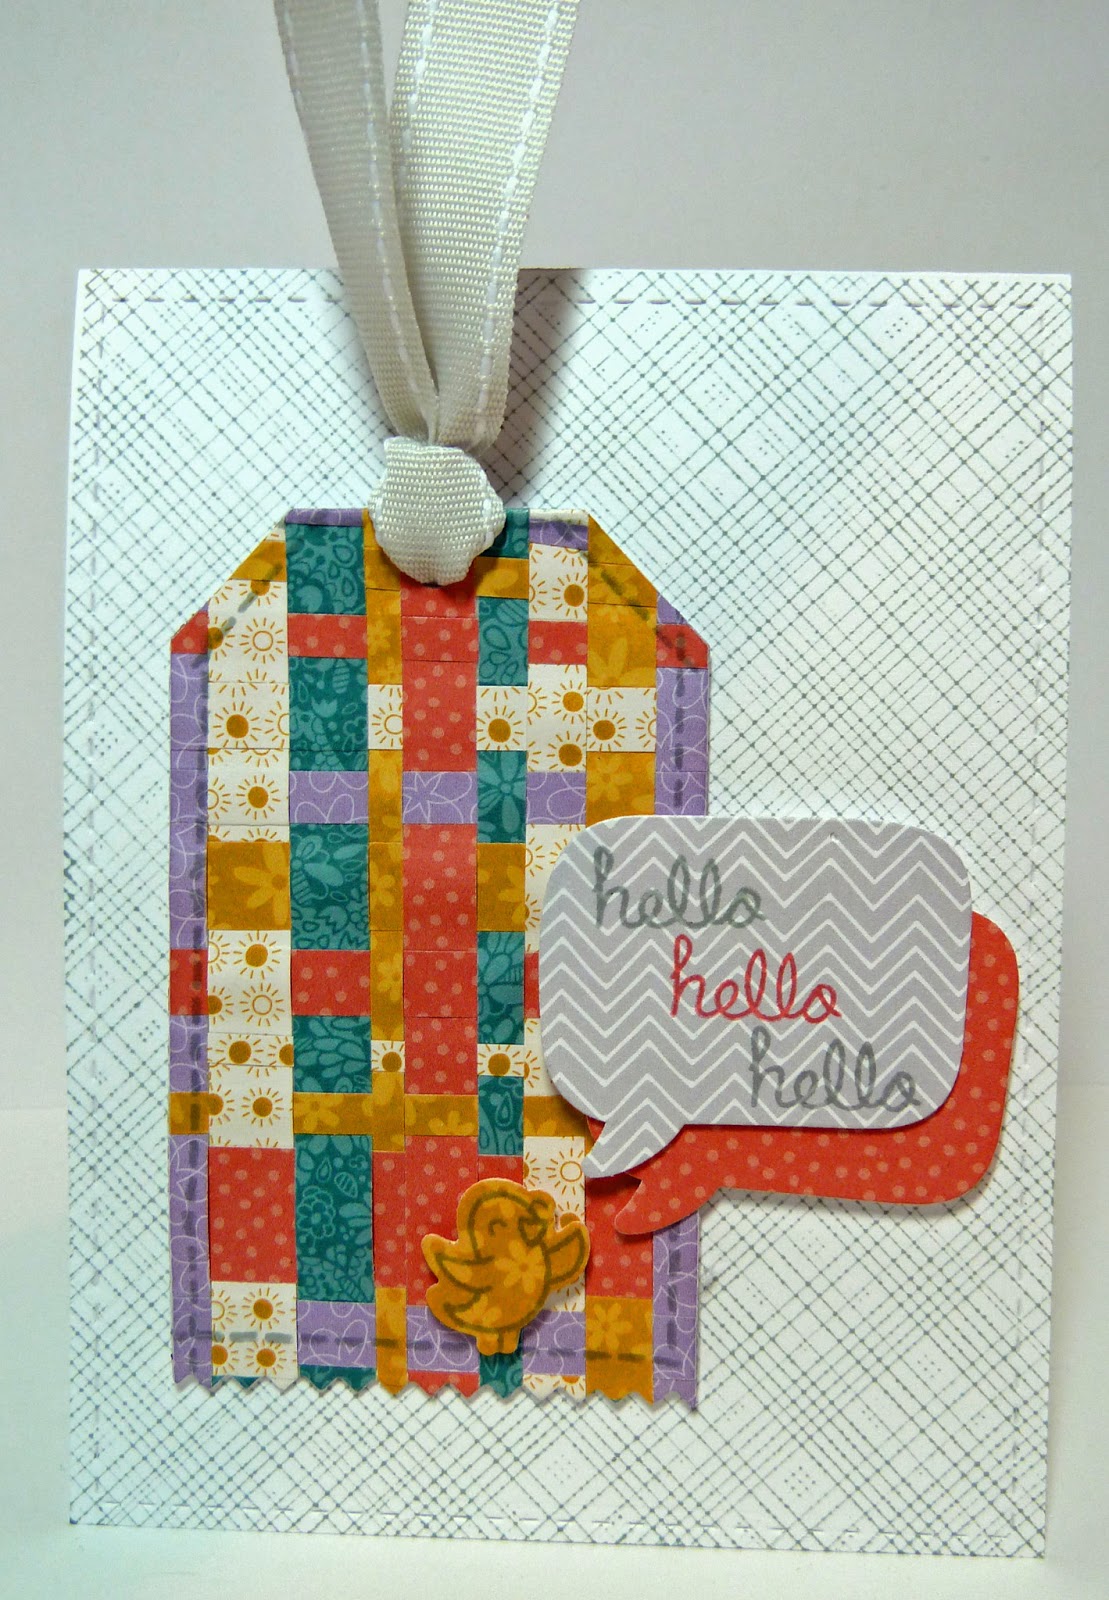
My last card uses a paper weaving technique, also taught on Day 5. I used more papers from Lawn Fawn Bright side and then cut my woven piece with a Tag Sale #6 die. I used my new Lawn Fawn dies to cut a birdie and some speech bubbles from the same paper pad. The challenge this week at Lawnscaping is Stitching, and I used two different types of stitching on this card--both faux, of course. The card base has faux stitching from a die, and the tag has faux stitching with a stamp from PTI Sew Simple Borders. I am also entering this card into the Speech Bubble Challenge in the Moxie Fab World, and the Simon Says Stamp challenge to create a spring card.
That's it for me today. Let me know if you have any questions about supplies. I'm too lazy to write them all up, and I have some more ideas for cards I want to make.
Thanks for Visiting
Hi there. I have 4 cards using some of the the tricks I learned from Day 3. This day was dedicated to tricks for working with hard to use or bold paper. So far, I think this has been the best day, in terms of helping me better use my patterned papers. Those big, bold and colorful papers that initially catch my eye and make me want to buy a paper pad, are often the ones that just it in the box, because I have no idea what to do with them (except pet and admire).
The first lesson was to cut the paper into strips and then reassemble them. Keep it simple, add a sentiment, and you are done. What a timely lesson. When I was going through my Basic Grey What's Up pad, I came across a piece that was so pretty, but the entire sheet was a scene. I loved the scene and the colors, but had no idea how to use them. Lucky for me, my Bountiful Banners arrived just as I was making this card.
I tried this idea on some paper from Bo Bunny Timepiece Collection. I bought this pad several years ago because I thought it would be great for masculine cards, but had never been able to figure out how to best use those papers. I stamped my sentiment from Hands of Time onto one of the tone on tone papers in that pad, and then matted it with a tiny border in white, a trick from Day 1. I distressed the edges, and I think it helps those papers work better together, another tip from Day 1.
My last two cards use another techinque from this lesson, of just using small amounts of the bold pattern. This first card uses 5 different patterns from Echo Park Hello Summer. I never would have done this before yesterday, but I think they all work so well together. Three of the patterns are tone on tone, so they work kind of like solids, the bold is in the front, and the fifth paper is just a striped strip, which ties all the colors together.
My last card uses papers from Echo Park So Happy Together, and is inspired by this card from Ashley during the PTI release. I used 4 patterns from this pad, but three of them are practically solids.
That's it for me today. I have some more ideas about things I can do with more of my bold and hard to use papers, and I have a new appreciation for all those tone on tone, solids, and subtle prints that are included in the 6X6 pads. This class is helping me see how to best use all of the types of papers included in those pads. Perhaps I should get some more of them now....
Thanks for Visiting
I realize that it is already Day 3, but I am here to post the cards I made for Day 2. I did 2 of them yesterday, and then had to complete the third this morning.
The first video of the day showed how to emboss resist on patterned paper. I just love the way that sounds, and I am pretty happy with how my card came out. I pretty much stuck to the layout of the first sample card by Jennifer McGuire. I used papers from Basic Grey What's Up, a Quickuts bird die I've had forever and never used before, and a sentiment from Paper Smooches. I used Turning a New Leaf to stamp my patterned paper, and sponged with Distress Faded Jeans ink.
Some of the pattern paper tricks I used on this card were to choose patterns from the same collection, separate two of the patterns with a miniscule strip of white, ink the edges of the patterned papers with a Copic T-4 marker, and carefully cut that little pink strip so an entire row of the pattern is centered (pretty much).
My next card is based on a video by Laura Bassen, where she stamps on patterned paper, over a mask of die cut letters. I used papers from Fancy Pants The Good Life for this card. One trick we learned was to hoard our striped papers, and to cut tiny strips to use on our cards. The colors in the card can then be based on the colors in the stripes. I stamped stripes from Background Basics Super Stripes in Harvest Gold, Aqua Mist, Real Red and Grey Flannel, which are the colors I pulled out of the striped pattern. I stamped over a mask made with the Hello die. I also inked all the edges with a Copic T-4 marker.
I was not totally thrilled with the way this card came out. I don't think my stamping was all that great, and didn't want to start over because I didn't have much of that polka dotted background paper. Something else was bothering me, and I didn't know what.
I had another idea for this same stamp set, die, patterned paper and color scheme. It came to me this morning during spin class, and I made the card as soon as I came home. I used a Pure Poppy die cut, layered and offset over the sentiment 'hello' stamped in Aqua Mist. I pulled the yellow out in a very thin strip on the right side, and used about 1/2 inch of the striped pattern on the left. The front panel is popped up on foam. I am happier about this card, and it seems more 'me', while still putting in place many of the things taught in the class so far.
Funny thing is that today's lesson, which I watched after making this card, had a card by Debbie Hughes, showing how to use a strip of patterned paper just like this, if you have a patterned paper that may be too bold or bright to use a lot of. So, maybe I am just a bit ahead? Do you have a preference?
That's it for now. I am off to try to make some cards based on today's lessons.
Thanks for Visiting
Lots of good information in the first day of my Pattern Play class. And, I have used part of 3 sheets of paper, and a bit of a scrap, too. Not a big dent in my stash, but it is a start.
We were advised on how to select papers to work together, and I picked three from Basic Grey Out of Print collection. One sheet is bold, one has a smallish pattern, and one is monochromatic (I think)--or in Amber's categories--bold, basic and blah. Here are the papers I chose.
We were advised to start with a sketch, so as not to cut and waste too much paper. I browsed through the Retro Sketches archives and picked RS #19.
I wanted that middle panel to stand out a bit, so I used this week's CAS-ual Fridays challenge of chipboard, and cut a piece of a box the same size as the panel. At the last moment, I decided to stamp the word 'PARTY' again on a little scrap from that same paper collection, and popped it up. I hope that I did not violate any class rules by using a 4th pattern. It looked festive to me, so I'm going with it.
Hopefully, I'll be back tomorrow with more cards using patterned paper.
Thanks for Visiting